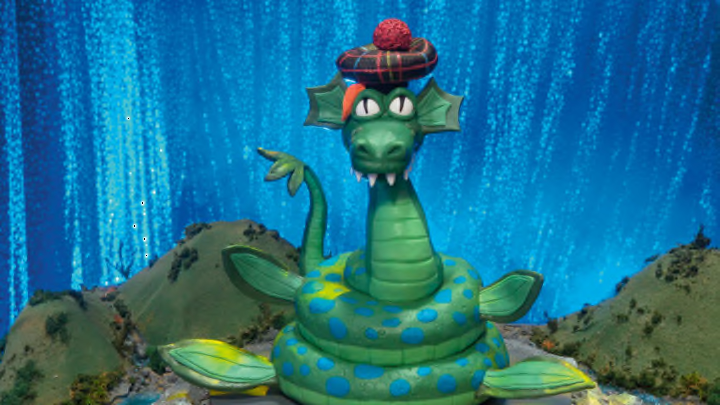
Anyone who has watched a baking competition appreciates that the structure is key to a cake’s success. From sliding cakes to crumbling layers, the underlying structure is imperative to obtaining that key visual.
Even though the flavor can come through in that first bite, no one really wants to eat a cake with their eyes closed. The reality is that the visual entices people to want taste after taste.
Assemble the Cake Layers
- Cut a 3⁄4-inch (2-cm) hole into the center of the 10-inch (25-cm), 8-inch (20-cm), and one of the 4-inch (10-cm) cake boards.
- Run a butter knife around the edge of one of the 10-inch (25-cm) cake pans. Place a plate over the pan and flip. Tap the bottom until the cake slips out. Remove the parchment paper. If the cake has a domed top, flip it over and cut it off with a large, serrated knife so the top is level. Set the cake on the 10-inch (25-cm) cake base. Cut a 3⁄4-inch (2-cm) hole in the center of the cake and remove the excess cake. With
a spatula (an offset spatula works great if you have one), spread a layer of buttercream on top, leaving the hole open. Repeat with the remaining 10-inch (25-cm) cake. - Using a serrated knife, shape the cake tier into a rounded shape, like a donut. (This will be the bottom coil of Nessie’s body. See the photo for reference.) Cover the entire tier with a layer of buttercream. It doesn’t have to be pretty or smooth because we’ll be covering it with fondant later. Set aside.
- Remove one of the 8-inch (20-cm) cakes from its pan, level if needed, and place it on the 8-inch (20-cm) cake board. Cut a 3⁄4-inch (2-cm) hole in the center of the cake and remove the excess cake. With a spatula (an offset spatula works great if you have one), spread a layer of buttercream on top, leaving the hole open. Repeat with the remaining 8-inch (20-cm) cake.
- Using a serrated knife, shape the cake tier into another rounded shape, like a donut. (This will be the next coil of Nessie’s body. See the photo for reference.) Cover the entire tier with a layer of buttercream. Set aside.
- Remove the 4-inch (10-cm) cake from its pan, level if needed, and place it on the 4-inch (10-cm) cake board. Cut a 3⁄4-inch (2-cm) hole in the center of the cake and remove the excess cake. Shape the cake tier into a rounded shape, like a donut. Cover the entire tier with a layer of buttercream.
Cover the Cakes in Fondant
- Lightly dust a flat surface with cornstarch. Roll out a piece of the dark green fondant into a thin sheet about 1⁄8 inch (3 mm) thick and large enough to cover the top half of the 10-inch (25-cm) cake tier (about 16 inches/40.5 cm in diameter). Drape it over the tier and smooth it with your hands. Trim the edges so the fondant only goes halfway down the sides. Cut a 3⁄4-inch (2-cm) hole in the center of the fondant on top, aligning it with the hole in the cake tier.
- Roll out a piece of the light green fondant into a rectangle 4 by 16 inches (10 by 40.5 cm). Cut it in half lengthwise so you have 2 rectangles. Wrap one around the bottom of the cake; it should reach halfway around. Wrap the other rectangle around the remaining bottom of the cake, trimming any excess. Make sure the edges of the dark green and light green fondant meet. Use a toothpick to score vertical lines in the light green fondant to make Nessie’s belly scales.
- Carefully lift the tier and slide it over the cake armature pipe to rest on the cake board.
- Repeat steps 1 through 3 for the 8-inch (20-cm) cake tier.
- Cover the entire 4-inch (10-cm) cake layer with dark green fondant. Cut a hole in the top of the fondant. Slide the layer over the pipe to rest on the other two tiers.
- Roll out the blue fondant to about 1⁄8 inch (3 mm) thick and cut out different size circles for Nessie’s spots. Attach them all over the dark green fondant of Nessie’s body with a small dab of water each. Use an empty icing tip to press circular indents into Nessie’s body for scales.
Add Support for Nessie’s Head
- Take the remaining 4-inch (10-cm) cake board and trim two of the sides to make an elongated rectangle with rounded corners. With a tooth- pick, lightly score a line dividing the rectangle in half lengthwise. Cut a 3⁄4-inch (2-cm) hole into the board about two-thirds of the way along that line. Set aside.
- Attach the pipe bushing (the T-shaped bracket) to the top of the PVC pipe with the flat side up. Using the end of a heavy spatula or small kitchen hammer, slowly tap on the sides of the bushing to move it down the pipe (don’t push too hard or fast, or it will slip down into your cake). Stop when it’s 6 inches (15 cm) from the top of the cake.
