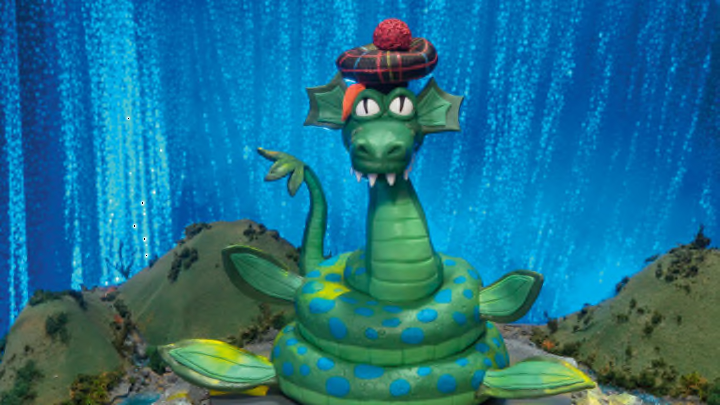
While tackling the body of the cake is a huge undertaking, the reality is that the finishing details turn Nessie from a green blob into a mythical creature. From the hat to her flippers, these little items are necessary evils.
Granted, these little details can have some personal flare, but it is best not to go too far off recipe. Even if you want to change the color a little or embellish a few details here and there, it is best to gain confidence first.
Make the Back of Nessie’s Head and Her Tam-O’-Shanter Hat
- In a large nonstick pot over medium-low, melt the butter.
- Add the marshmallows and immediately take the pot off the heat. Stir continuously until the marshmallows melt. Stir in the rice cereal and mix until coated. Pour the mixture onto a piece of parchment or foil on a flat surface and allow to cool.
- When cool enough to handle, but not yet cold or too hard, scoop half the mixture and form it into a sphere about 3 inches (7.5 cm) in diameter. Cut the ball in half. Set one half aside; this will be the top half of Nessie’s head.
- Cut the other half in half again. Take the two pieces and press them around the bottom of the PVC bracket to form the bottom half of Nessie’s head.
- Slide the cake board rectangle down the pipe onto the bracket so the long end points forward; this will support Nessie’s protruding snout. Slide the top half of Nessie’s head down the pipe. Use some of the extra crispy rice cereal mixture to “glue” the top and bottom of the head together around the back of the cake board.
- Use the remaining crispy cereal mixture to form a flat, round hat 4 inches (10 cm) in diameter and 1 inch (2.5 cm) thick. Set aside.
Make Nessie’s Neck and the Rest of Her Head
- Knead the white modeling chocolate until soft. Roll two 1-inch (2.5-cm) balls for Nessie’s eyes. Roll out the modeling chocolate and cut out 6 triangles for Nessie’s teeth. Dye a walnut-size piece of white modeling chocolate red. Wrap all pieces in plastic wrap and set aside.
- Divide the rest of the white modeling chocolate into four equal pieces. Use green food coloring to dye one piece dark green and set aside. Recombine the remaining pieces into one larger piece and use green food coloring to dye it light green.
- Press the green modeling chocolate around the PVC pipe as you would with modeling clay from the bottom of Nessie’s chin to the top of the cake to make her neck, using the photo as a reference.
- Use green modeling chocolate to form a snout on top of the cake board support. Wrap Nessie’s entire head and snout in green modeling chocolate. Add small round green freckles along the sides of her snout. Use a flat knife or modeling tool to carve out Nessie’s nostrils.
- Attach the white eyeballs to the head with toothpicks. Use green modeling chocolate to make upper and lower eyelids, using the photo as a reference.
- Attach the teeth to Nessie’s mouth using dabs of water.
Make Nessie’s Tail and Flippers
- Bend the cake wire into a 10-inch (25-cm) tail with a three-pronged tip. Wrap with foil to bulk the tail up, leaving the bottom 2 inches (5 cm) uncovered. Cover the tip with dark green modeling chocolate and the rest of the tail with green modeling chocolate. Set aside.
- Use dark green modeling chocolate to make two 5-inch (12-cm) long flippers and two 4-inch (10-cm) long flippers. Attach a layer of green chocolate for shading, using the photo as a reference. Use a toothpick or sharp knife to carve details. Attach the two bigger flippers to the bottom cake tier and the two smaller flip- pers to the second cake tier using cake wire.
- Use dark green modeling chocolate to cut out Nessie’s ears. Attach a layer of green chocolate for shading, using a toothpick or knife to score details. Attach to the sides of Nessie’s head using cake wire.
- Roll out 2 strips of light green fondant and attach to the front of Nessie’s neck and tail. Score on scales.
- Press Nessie’s tail into the back of the cake.
Finish Nessie’s Hat
- Knead the brown modeling chocolate until soft and wrap the crispy cereal hat in it. Press onto the top of the PVC pipe. Roll one 1½-inch (4-cm) ball out of brown modeling chocolate and attach it to the top of the hat with a tooth- pick. Use a sharp knife or a crumpled ball of foil to add texture.
- Use red and black food coloring and a paint- brush to paint a plaid pattern on the hat and shade the ball. Paint black slits on Nessie’s eyeballs.
- Unwrap the red modeling chocolate. Form it into a ribbon and attach it to the bottom of the hat just over Nessie’s eye using cake wire.
Craving more Nailed It! entertainment? The sixth season of the Magical Elves-produced “Nailed It!” can be streamed on Netflix. In addition, the official companion cookbook Nailed It! Baking Challenges for the Rest of Us is now available for purchase from AbramsBooks.com as well as other retailers.
How did your Loch Ness Monster Cake turn out? Share a picture of how your amazing creation.
